New to Voyager? Please start here.
Issue Let’s Encrypt certificate using AWS Route53
This tutorial shows how to issue free SSL certificate from Let’s Encrypt via DNS challenge for domains using Route53 DNS service.
This article has been tested with a kops managed Kubernetes cluster on AWS.
$ kops version
Version 1.7.1 (git-c69b811)

$ kubectl version --short
Client Version: v1.8.8
Server Version: v1.8.8
Deploy Voyager operator
Install Voyager operator in your cluster following the steps here.
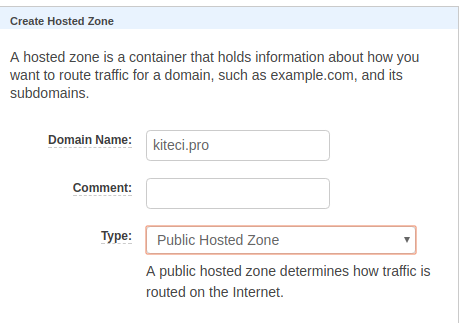
Setup Route53 Hosted Zone
In this tutorial, I am going to use kiteci.pro domain that was purchased on namecheap.com . Now, go to your AWS Route53 console and create a hosted zone for this domain.
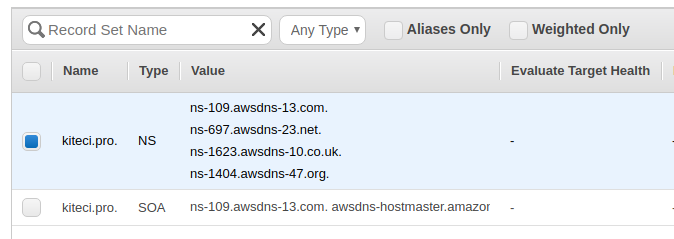
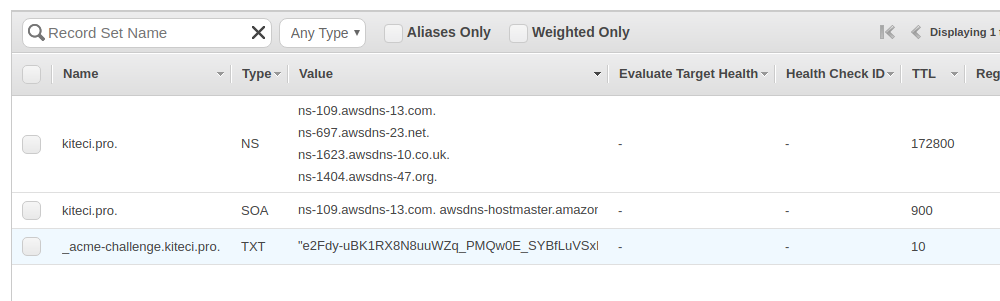
Once the hosted zone is created, you can see the list of name servers in AWS console.
Now, go to the website of your domain registrar and update the list of name servers.
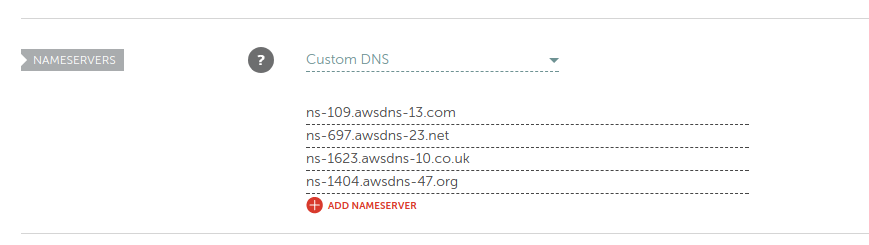
Give time to propagate the updated DNS records. You can use the following command to confirm that the name server records has been updated.
$ dig -t ns kiteci.pro

; <<>> DiG 9.10.3-P4-Ubuntu <<>> -t ns kiteci.pro
;; global options: +cmd
;; Got answer:
;; ->>HEADER<<- opcode: QUERY, status: NOERROR, id: 57300
;; flags: qr rd ra; QUERY: 1, ANSWER: 4, AUTHORITY: 0, ADDITIONAL: 1

;; OPT PSEUDOSECTION:
; EDNS: version: 0, flags:; udp: 512
;; QUESTION SECTION:
;kiteci.pro.			IN	NS

;; ANSWER SECTION:
kiteci.pro.		21599	IN	NS	ns-109.awsdns-13.com.
kiteci.pro.		21599	IN	NS	ns-1404.awsdns-47.org.
kiteci.pro.		21599	IN	NS	ns-1623.awsdns-10.co.uk.
kiteci.pro.		21599	IN	NS	ns-697.awsdns-23.net.

;; Query time: 58 msec
;; SERVER: 127.0.1.1#53(127.0.1.1)
;; WHEN: Mon Nov 27 13:40:03 PST 2017
;; MSG SIZE  rcvd: 179
Configure IAM Permissions
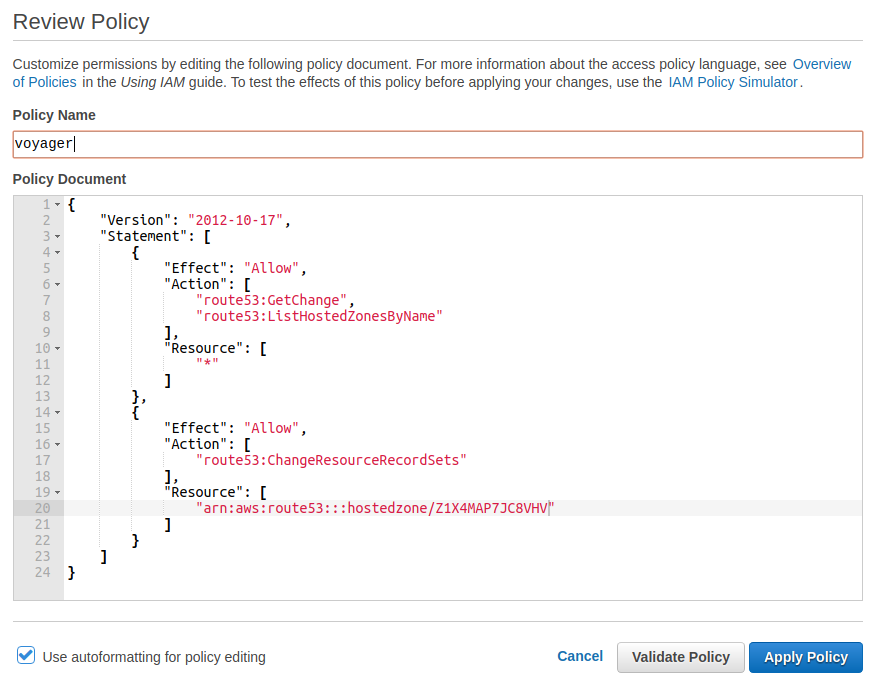
To issue SSL certificate using Let’s Encrypt, we have to prove that we own the kiteci.pro domain. The following AWS IAM policy document describes the permissions required for voyager operator to complete the DNS challenge. Replace <INSERT_YOUR_HOSTED_ZONE_ID_HERE> with the Route 53 zone ID of the domain you are authorizing.
{
    "Version": "2012-10-17",
    "Statement": [
        {
            "Effect": "Allow",
            "Action": [
                "route53:GetChange",
                "route53:ListHostedZonesByName"
            ],
            "Resource": [
                "*"
            ]
        },
        {
            "Effect": "Allow",
            "Action": [
                "route53:ChangeResourceRecordSets"
            ],
            "Resource": [
                "arn:aws:route53:::hostedzone/<INSERT_YOUR_HOSTED_ZONE_ID_HERE>"
            ]
        }
    ]
}
There are few different ways to grant these permissions to voyager operator pods.
option 1: Using Instance IAM Role
When kops creates a cluster, it creates 2 IAM roles: one for the master and one for the nodes. You can grant these additional IAM permissions to the appropriate instance IAM role.
Here, we are running voyager operator pod on master node. So, we will grant these permissions to the role assigned to the master instance. To do this, take the following steps:
- Go to your EC2 dashboard and identify the IAM role for your master instance.
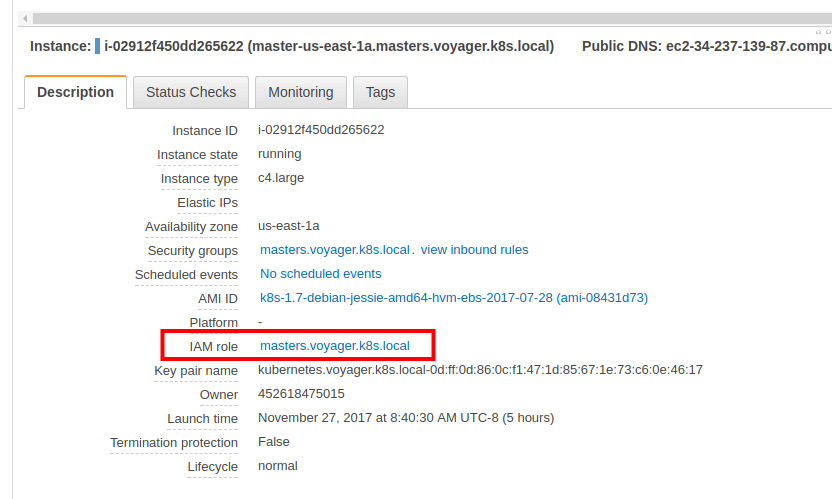
- Go the IAM roles console and select the master IAM role for your cluster.
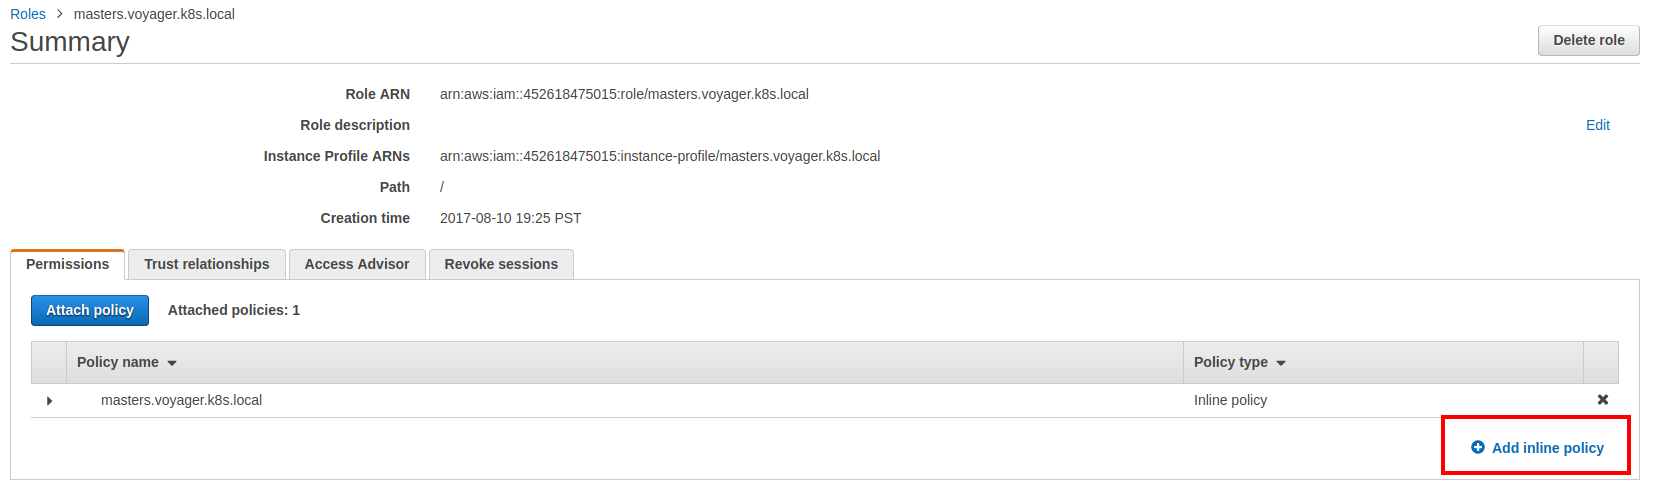
- Now add the custom inline policy show above.
NB: If you decide to run voyager operator on regular nodes, then you can grant these additional IAM permissions to the node IAM role for your cluster. Please note that this will allow any pods running on the nodes to perform these api calls.
option 2: Create IAM User
If you are running cluster on cloud providers other than AWS but want to use Route53 as your DNS provider, this is your only option. You can also use this method for clusters running on AWS.
Here we will create a new IAM role called voyager and grant it the necessary permissions. Then we wil issue an access key pair for this IAM role and pass this to voyager using a Kubernetes secret.
aws iam create-user --user-name voyager
aws iam put-user-policy --user-name voyager --policy-name voyager --policy-document file://$PWD/voyager-policy.json
aws iam create-access-key --user-name voyager

kubectl create secret generic voyager-route53 --namespace default \
  --from-literal=AWS_ACCESS_KEY_ID=INSERT_YOUR_ACCESS_KEY_ID_HERE \
  --from-literal=AWS_SECRET_ACCESS_KEY=INSERT_YOUR_SECRET_ACCESS_KEY_HERE \
  --from-literal=AWS_HOSTED_ZONE_ID=INSERT_YOUR_HOSTED_ZONE_ID_HERE

kubectl get secret voyager-route53 -o yaml
apiVersion: v1
data:
  AWS_ACCESS_KEY_ID: SU5TRVJUX1lPVVJfQUNDRVNTX0tFWV9JRF9IRVJF
  AWS_HOSTED_ZONE_ID: SU5TRVJUX1lPVVJfSE9TVEVEX1pPTkVfSURfSEVSRQ==
  AWS_SECRET_ACCESS_KEY: SU5TRVJUX1lPVVJfU0VDUkVUX0FDQ0VTU19LRVlfSEVSRQ==
kind: Secret
metadata:
  creationTimestamp: 2017-11-27T23:17:31Z
  name: voyager-route53
  namespace: default
  resourceVersion: "16160"
  selfLink: /api/v1/namespaces/default/secrets/voyager-route53
  uid: 24949869-d3c9-11e7-98b3-08002787a1b5
type: Opaque
NB:
- Please make sure that you have updated the voyager-policy.json file to use the hosted zone id for your domain.
- The
file://prefix is required, otherwise you will get an error likeAn error occurred (MalformedPolicyDocument) when calling the PutUserPolicy operation: Syntax errors in policy. - The Kubernetes secret must be created in the same namespace where the
Certificateobject exists. AWS_HOSTED_ZONE_IDkey is optional and will be automatically detected from DNS records, if not found in secret. If you are trying to issue a SANS certificate with multiple top level domains, do not setAWS_HOSTED_ZONE_IDin the secret.
Create Certificate
Create a secret to provide ACME user email. Change the email to a valid email address and run the following command:
kubectl create secret generic acme-account --from-literal=ACME_EMAIL=me@example.com
Create the Certificate CRD to issue TLS certificate from Let’s Encrypt using DNS challenge.
kubectl apply -f crt.yaml

apiVersion: voyager.appscode.com/v1beta1
kind: Certificate
metadata:
  name: kitecipro
  namespace: default
spec:
  domains:
  - kiteci.pro
  - www.kiteci.pro
  acmeUserSecretName: acme-account
  challengeProvider:
    dns:
      provider: route53
Now, voyager will perform domain validation by setting a TXT record for each domain by prepending the label _acme-challengeto the domain name being validated in this certificate using IAM role assigned to master instance. This TXT record will be removed after validation is complete. Once you successfully complete the challenges for a domain, the resulting authorization is cached for your account to use again later. Cached authorizations last for 30 days from the time of validation. If the certificate you requested has all of the necessary authorizations cached then validation will not happen again until the relevant cached authorizations expire.
After several minutes, you should see a new secret named tls-kitecipro. This contains the tls.crt and tls.key .
$ kubectl get secrets
NAME                  TYPE                                  DATA      AGE
acme-account          Opaque                                3         2m
default-token-q3r9h   kubernetes.io/service-account-token   3         7h
tls-kitecipro         kubernetes.io/tls                     2         20s

$ kubectl describe secrets tls-kitecipro
Name:         tls-kitecipro
Namespace:    default
Labels:       <none>
Annotations:  <none>

Type:  kubernetes.io/tls

Data
====
tls.crt:  3452 bytes
tls.key:  1675 bytes
$ kubectl describe cert kitecipro
Name:         kitecipro
Namespace:    default
Labels:       <none>
Annotations:  kubectl.kubernetes.io/last-applied-configuration={"apiVersion":"voyager.appscode.com/v1beta1","kind":"Certificate","metadata":{"annotations":{},"name":"kitecipro","namespace":"default"},"spec":{"acmeU...
API Version:  voyager.appscode.com/v1beta1
Kind:         Certificate
Metadata:
  Cluster Name:
  Creation Timestamp:             2017-11-27T23:44:42Z
  Deletion Grace Period Seconds:  <nil>
  Deletion Timestamp:             <nil>
  Generation:                     0
  Resource Version:               33312
  Self Link:                      /apis/voyager.appscode.com/v1beta1/namespaces/default/certificates/kitecipro
  UID:                            f105dd07-d3cc-11e7-8b04-02cf95c35e16
Spec:
  Acme User Secret Name:  acme-account
  Challenge Provider:
    Dns:
      Provider:  route53
  Domains:
    kiteci.pro
Status:
  Conditions:
    Last Update Time:  2017-11-27T23:46:19Z
    Type:              Issued
  Last Issued Certificate:
    Account Ref:      https://acme-v01.api.letsencrypt.org/acme/reg/24975560
    Cert Stable URL:
    Cert URL:         https://acme-v01.api.letsencrypt.org/acme/cert/04e8ad4af6110eab90e8abaef338c5ce9049
    Not After:        2018-02-25T22:46:19Z
    Not Before:       2017-11-27T22:46:19Z
    Serial Number:    427624998516761213595074237026103943139401
Events:
  Type    Reason           Age   From              Message
  ----    ------           ----  ----              -------
  Normal  IssueSuccessful  1m    voyager-operator  Successfully issued certificate
  Normal  IssueSuccessful  1m    voyager operator  Successfully issued certificate
NB
- By default, voyager will store the issued SSL certificates in a secret named as
tls-<certificate-name>. If you want to store the issued certificates in a different secret, you can provide that in that in thespec.storage.secret.namefield in theCertificateobject.
$ cat crt-secret-store.yaml

apiVersion: voyager.appscode.com/v1beta1
kind: Certificate
metadata:
  name: kitecipro
  namespace: default
spec:
  domains:
  - kiteci.pro
  - www.kiteci.pro
  acmeUserSecretName: acme-account
  challengeProvider:
    dns:
      provider: route53
  storage:
    secret:
      name: cert-kitecipro
- If you created an IAM user for voyager, you can pass it by setting
spec.challengeProvider.dns.credentialSecretNamefield.
$ cat crt-dns-credential.yaml

apiVersion: voyager.appscode.com/v1beta1
kind: Certificate
metadata:
  name: kitecipro-iam
  namespace: default
spec:
  domains:
  - kiteci.pro
  - www.kiteci.pro
  acmeUserSecretName: acme-account
  challengeProvider:
    dns:
      provider: route53
      credentialSecretName: voyager-route53
  storage:
    secret:
      name: cert-kitecipro
Configure Ingress
We are going to use two separate services as backend. Run the following commands to deploy backends:
kubectl run nginx --image=nginx
kubectl expose deployment nginx --name=web --port=80 --target-port=80

kubectl run echoserver --image=gcr.io/google_containers/echoserver:1.4
kubectl expose deployment echoserver --name=echo --port=80 --target-port=8080
Now create Ingress ing-tls.yaml
kubectl apply -f ing-tls.yaml

apiVersion: voyager.appscode.com/v1beta1
kind: Ingress
metadata:
  name: test-ingress
  namespace: default
  annotations:
    ingress.appscode.com/rewrite-target: /
spec:
  tls:
  - hosts:
    - www.kiteci.pro
    ref:
      kind: Secret
      name: tls-kitecipro
  rules:
  - host: www.kiteci.pro
    http:
      paths:
      - path: /web
        backend:
          serviceName: web
          servicePort: 80
      - path: /
        backend:
          serviceName: echo
          servicePort: 80
Wait for the LoadBalancer CNAME to be assigned. Once the CNAME is assigned, set the LoadBalancer hostname as the CNAME record for test domain www.kiteci.pro
$ kubectl get svc voyager-test-ingress -o wide
NAME                   TYPE           CLUSTER-IP       EXTERNAL-IP                                                               PORT(S)                      AGE       SELECTOR
voyager-test-ingress   LoadBalancer   100.67.213.242   a65b35533d3d211e78b0402cf95c35e1-1933171379.us-east-1.elb.amazonaws.com   443:31708/TCP,80:31905/TCP   36s       origin-api-group=voyager.appscode.com,origin-name=test-ingress,origin=voyager

Now wait a bit for DNs to propagate. Run the following command to confirm DNS propagation.
$ dig -t cname +short www.kiteci.pro
a65b35533d3d211e78b0402cf95c35e1-1933171379.us-east-1.elb.amazonaws.com.
Now open URL https://www.kiteci.pro/web . This should show you the familiar nginx welcome page. If you visit https://www.kiteci.pro , it will echo your connection info.