New to Voyager? Please start here.
Installation Guide
To use the Voyager, you can grab 1 year free license from here. After that, you can issue another license for one more year. Typically we release a new version of the operator at least quarterly. So, you can just grab a new license every time you upgrade the operator.
Get a License
In this section, we are going to show you how you can get a 1 year free license for the Voyager Community edition. You can get a license for your Kubernetes cluster by going through the following steps:
-
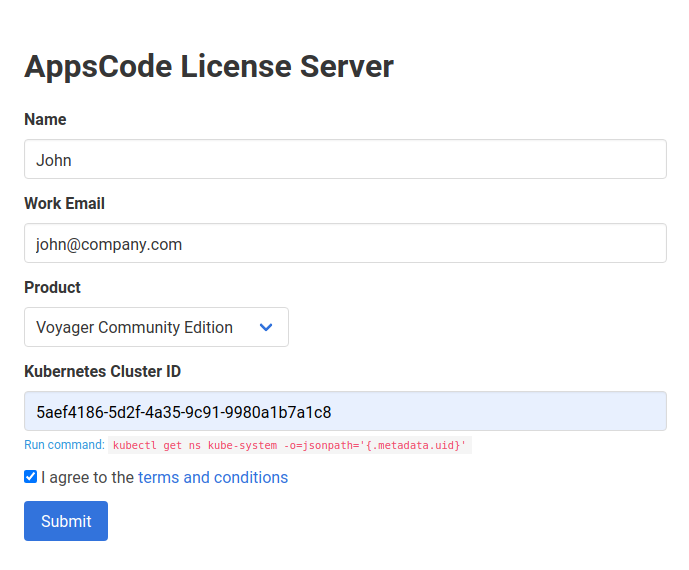
At first, go to AppsCode License Server and fill-up the form. It will ask for your Name, Email, the product you want to install, and your cluster ID (UID of the
kube-systemnamespace). -
Provide your name and email address. You can provide your personal or work email address.
-
Then, select
Voyager Community Editionin the product field. -
Now, provide your cluster-ID. You can get your cluster ID easily by running the following command:
$ kubectl get ns kube-system -o=jsonpath='{.metadata.uid}' -
Then, you have to agree with the terms and conditions. We recommend reading it before checking the box.
-
Now, you can submit the form. After you submit the form, the AppsCode License server will send an email to the provided email address with a link to your license file.
-
Navigate to the provided link and save the license into a file. Here, we save the license to a
license.txtfile.
Here is a screenshot of the license form.
You can create licenses for as many clusters as you want. You can upgrade your license any time without re-installing Voyager by following the upgrading guide from here.
Voyager licensing process has been designed to work with CI/CD workflow. You can automatically obtain a license from your CI/CD pipeline by following the guide from here.
Install
Voyager operator can be installed as a Helm chart or simply as Kubernetes manifests.
Using Helm 3
Voyager can be installed via Helm 3.x or later versions using the chart from AppsCode Charts Repository. To install the chart with the release name my-release:
$ helm repo add appscode https://charts.appscode.com/stable/
$ helm repo update

$ helm search repo appscode/voyager --version v2021.04.24-rc.0
NAME              CHART VERSION APP VERSION DESCRIPTION
appscode/voyager  v2021.04.24-rc.0    v2021.04.24-rc.0  Voyager by AppsCode - Secure HAProxy Ingress Controller...

# provider=acs
# provider=aks
# provider=aws
# provider=azure
# provider=baremetal
# provider=gce
# provider=gke
# provider=minikube
# provider=openstack
# provider=metallb
# provider=digitalocean
# provider=linode

$ helm install voyager-operator appscode/voyager \
  --version v2021.04.24-rc.0 \
  --namespace kube-system \
  --set cloudProvider=$provider \
  --set-file license=/path/to/the/license.txt
To see the detailed configuration options, visit here.
Using Helm 2
Voyager can be installed via Helm 2.9.x or later versions using the chart from AppsCode Charts Repository. To install the chart with the release name my-release:
$ helm repo add appscode https://charts.appscode.com/stable/
$ helm repo update

$ helm search appscode/voyager --version v2021.04.24-rc.0
NAME              CHART VERSION APP VERSION DESCRIPTION
appscode/voyager  v2021.04.24-rc.0    v2021.04.24-rc.0  Voyager by AppsCode - Secure HAProxy Ingress Controller...

# provider=acs
# provider=aks
# provider=aws
# provider=azure
# provider=baremetal
# provider=gce
# provider=gke
# provider=minikube
# provider=openstack
# provider=metallb
# provider=digitalocean
# provider=linode

$ helm install appscode/voyager --name voyager-operator \
  --version v2021.04.24-rc.0 \
  --namespace kube-system \
  --set cloudProvider=$provider \
  --set-file license=/path/to/the/license.txt
To see the detailed configuration options, visit here.
Using YAML
If you prefer to not use Helm, you can generate YAMLs from Voyager operator chart and deploy using kubectl. Here we are going to show the prodecure using Helm 3.
$ helm repo add appscode https://charts.appscode.com/stable/
$ helm repo update

$ helm search repo appscode/voyager --version v2021.04.24-rc.0
NAME              CHART VERSION APP VERSION DESCRIPTION
appscode/voyager  v2021.04.24-rc.0    v2021.04.24-rc.0  Voyager by AppsCode - Secure HAProxy Ingress Controller...

# provider=acs
# provider=aks
# provider=aws
# provider=azure
# provider=baremetal
# provider=gce
# provider=gke
# provider=minikube
# provider=openstack
# provider=metallb
# provider=digitalocean
# provider=linode

$ helm template voyager-operator appscode/voyager \
  --version v2021.04.24-rc.0 \
  --namespace kube-system \
  --set cloudProvider=$provider \
  --set-file license=/path/to/the/license.txt    \
  --set cleaner.skip=true | kubectl apply -f -
To see the detailed configuration options, visit here.
Installing in GKE Cluster
If you are installing Voyager on a GKE cluster, you will need cluster admin permissions to install Voyager operator. Run the following command to grant admin permision to the cluster.
$ kubectl create clusterrolebinding "cluster-admin-$(whoami)" \
  --clusterrole=cluster-admin \
  --user="$(gcloud config get-value core/account)"
Installing in Minikube
Voyager can be used in minikube using --provider=minikube. In Minikube, a LoadBalancer type ingress will only assigned a NodePort.
Installing in Baremetal Cluster
Voyager works great in baremetal cluster. To install, set --provider=baremetal. In baremetal cluster, LoadBalancer type ingress in not supported. You can use NodePort, HostPort or Internal ingress objects.
Installing in Baremetal Cluster with MetalLB
Follow the instructions for installing on baremetal cluster but specify metallb as provider. Then install MetalLB following the instructions here. Now, you can use LoadBalancer type ingress in baremetal clusters.
Installing in DigitalOcean Cluster
To use LoadBalancer type ingress in DigitalOcean cluster, install Kubernetes cloud controller manager for DigitalOcean. Otherwise set cloud provider to barematal.
Installing in Linode Cluster
To use LoadBalancer type ingress in Linode cluster, install Kubernetes cloud controller manager for Linode. Otherwise set cloud provider to barematal.
Verify installation
To check if Voyager operator pods have started, run the following command:
$ kubectl get pods --all-namespaces -l app=voyager --watch
Once the operator pods are running, you can cancel the above command by typing Ctrl+C.
Now, to confirm CRD groups have been registered by the operator, run the following command:
$ kubectl get crd -l app=voyager
Now, you are ready to create your first ingress using Voyager.
Configuring RBAC
Voyager creates two CRDs: Ingress and Certificate. Voyager installer will create 2 user facing cluster roles:
| ClusterRole | Aggregates To | Desription |
|---|---|---|
| appscode:voyager:edit | admin, edit | Allows edit access to Voyager CRDs, intended to be granted within a namespace using a RoleBinding. |
| appscode:voyager:view | view | Allows read-only access to Voyager CRDs, intended to be granted within a namespace using a RoleBinding. |
These user facing roles supports ClusterRole Aggregation feature in Kubernetes 1.9 or later clusters.
Using kubectl
Since Voyager uses its own TPR/CRD, you need to use full resource kind to find it with kubectl.
# List all voyager ingress
$ kubectl get ingress.voyager.appscode.com --all-namespaces

# List voyager ingress for a namespace
$ kubectl get ingress.voyager.appscode.com -n <namespace>

# Get Ingress YAML
$ kubectl get ingress.voyager.appscode.com -n <namespace> <ingress-name> -o yaml

# Describe Ingress. Very useful to debug problems.
$ kubectl describe ingress.voyager.appscode.com -n <namespace> <ingress-name>
Detect Voyager version
To detect Voyager version, exec into the operator pod and run voyager version command.
$ POD_NAMESPACE=kube-system
$ POD_NAME=$(kubectl get pods -n $POD_NAMESPACE -l app=voyager -o jsonpath={.items[0].metadata.name})
$ kubectl exec -it $POD_NAME -n $POD_NAMESPACE voyager version

Version = v2021.04.24-rc.0
VersionStrategy = tag
Os = alpine
Arch = amd64
CommitHash = ab0b38d8f5d5b4b4508768a594a9d98f2c76abd8
GitBranch = release-4.0
GitTag = v2021.04.24-rc.0
CommitTimestamp = 2017-10-08T12:45:26